Lazy grain boundaries
i
prune image*
(*cut off unconnected lines)
Lazy grain boundaries
t j i t j i
twice the following:
thicken outlines
skeletonize image
prune image
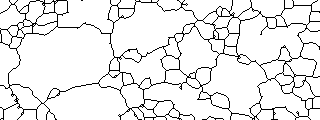
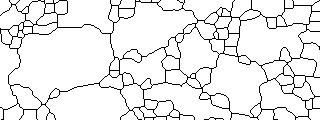
Finally, the image is thickened is pruned (key i). In the first round, thickenning (key t) may be omitted, if the grain boundaries are very heavy already. The sequence of thickening-thinning-pruning (keys t j i) may be varied according to the type of image. It is not advisable to use more iterations of thickening (key t) and thinning (key j) than is absolutely necessary as this may lead to artefacts. Additional pruning (key i) may be used liberally to get rid of very long unconnected line segments, pruning does not produce artefacts. You now have a completely segmented image: a grain boundary map. Inspect it carefully: doe it look "natural", or does it have a lot of 45° diagonals and junctions of four? And when superposed onto the original image, do the outlines track what you perceive as grain boundaries? If yes, save the image, and continue with step 10. If no: go back to step 1 and try again; do not use "funky" looking grain boundary maps.
|
|
Lazy grain boundariesiprune image*
(*cut off unconnected lines) |
|
|
Lazy grain boundariest j i t j itwice the following: => outlines |
Start GRAIN BOUNDARY DETECTION step 1 - step 2 - step 3 - step 4 - step 5 - step 6/7 - step 8/9